Campaign Management
Campaign Structure
To get started, click on the Campaigns module in the navigation bar on the left side. This will take you to the All Campaigns page, where all your campaigns are displayed as visually appealing cards.

To create a new campaign, click on the New Campaign button. Enter the campaign name, advertiser name, and publisher name. Then, click Create to set up your campaign.


Each campaign card will display key information, including the campaign's creation date, advertiser name, publisher name, last modified date, and important metrics like lifetime impressions, views, clicks, and CTR.
Additionally, the campaign cards include buttons that take you directly to the Creatives listing page, Placements listing page, and Campaign Analytics page.
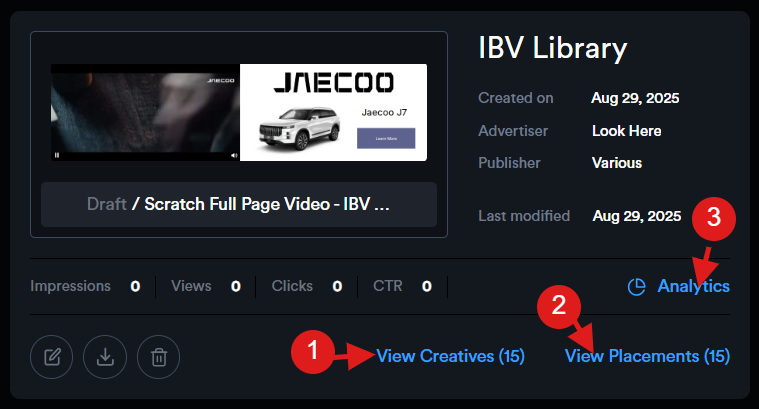
You can also edit, delete, or download the tags associated with a campaign.
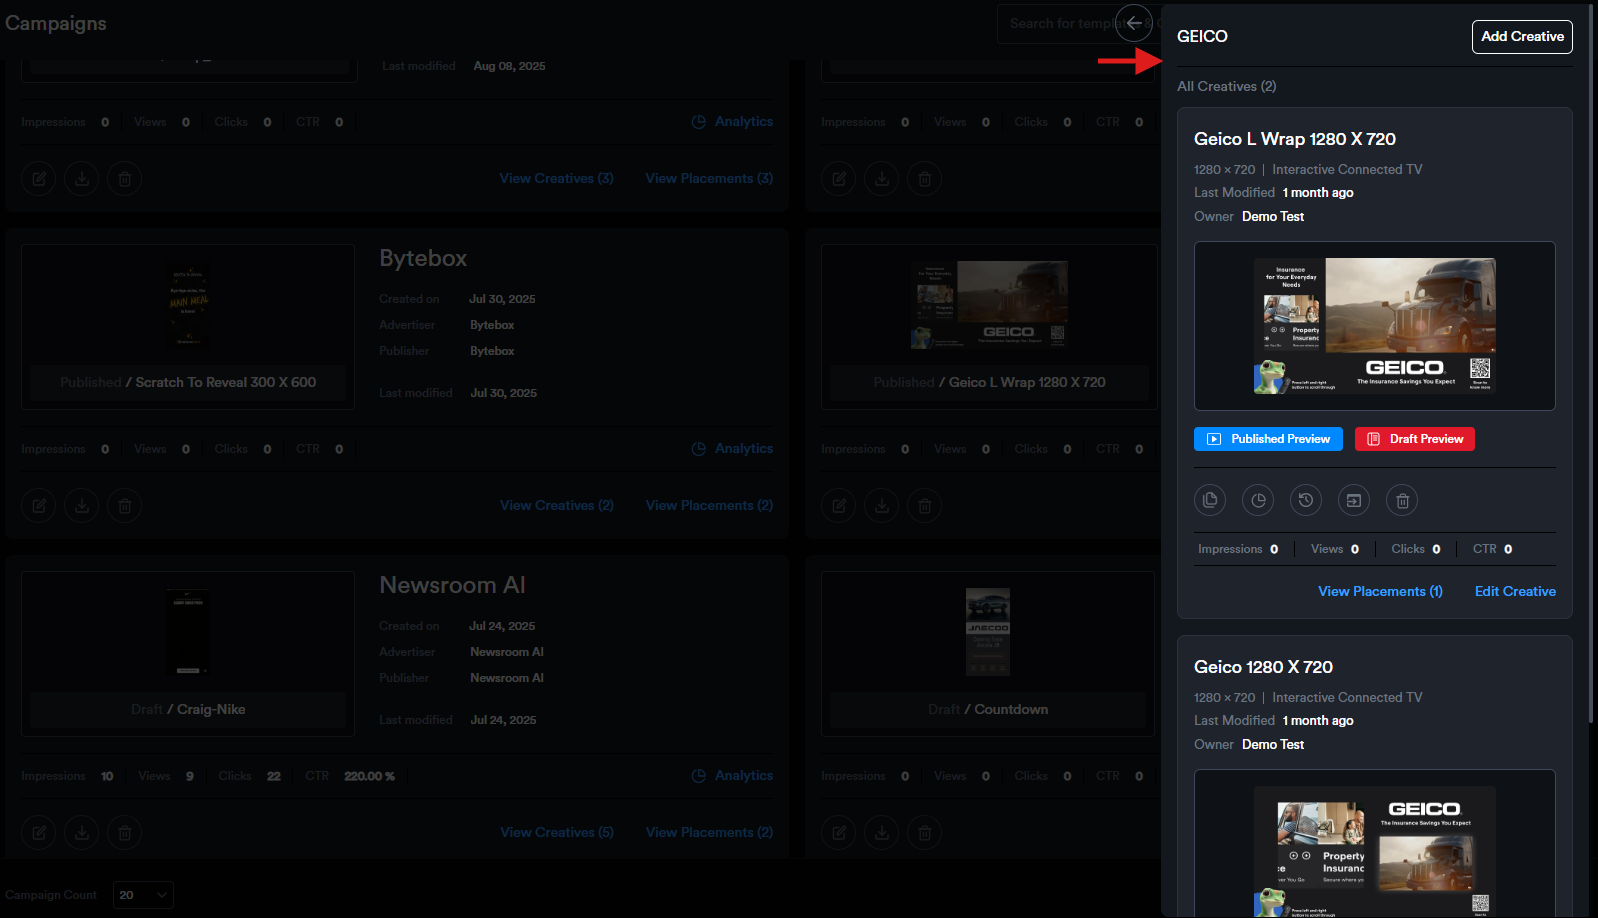
Campaign Preview: By clicking on a campaign thumbnail, you'll be directed to a preview page where all the campaign creatives are listed, allowing users to quickly scroll through and view them.
Creative Management
Adding a New Creative to a Campaign
To add a new creative to a campaign, click the "Add Creative" button.

This will open the New Creative modal, where you can enter the required creative details. Campaign information will be auto-filled.

- Select the Ad Type – Choose from the available options: Rich Media Display, Interactive Video, Interstitial, or Interactive Connected TV, depending on the format you wish to build.
- Enter a Creative Name – Provide a name to help identify your creative.
- Enable Responsive Layout (optional) – Check this box if you want the creative to be built with a responsive layout.
- Choose Canvas Size – Select from predefined ad dimensions or enter custom dimensions as needed.
Once all necessary details are filled out, click the "Create" button. You will then be redirected to the Drag and Drop Ad Builder, where you can begin building your ad.
Viewing and Managing Creatives within a Campaign
Once added, creatives are displayed as individual cards within the campaign view.

Each creative card provides key details, including:
- Last Modified Date
- Creative Owner
- Performance Metrics: Lifetime impressions, views, clicks, and click-through rate (CTR)
Users have access to the following actions on each creative card:
- Preview Draft and Preview Published versions
- Edit Creative
- Duplicate Creative
- View Analytics
- View Activity
- Save as Template
- Delete Creative
Additionally, each card includes a button to navigate directly to the Placements Listing page associated with that creative.
Placement Management
How to Assign A Creative to Multiple Placements
What is a Placement?
Placements is a new creative management method within Adctv allowing for a more granular view of different creatives in campaigns.
Each creative setup will by default be assigned against a Placement and the Tags will now be generated at the Placement level.
A single creative can now be assigned to multiple Placements and each Placement Tag can be provided to different media partners. This allows better tracking of the performance and optimizing accordingly.
Accessing and Managing Placements within a Campaign
To view the list of placements associated with a campaign, navigate to the campaign card and click on "View Placements." This will open a sidebar displaying all placements linked to that campaign.

To create a new placement for a creative, click the "New Placement" button.

Provide the Placement Name and select the Insertion Type, then click "Add Placement" to save.

Each placement includes a set of action buttons under the Action section, allowing you to:
- Export the placement to view the tag and preview.
- Download the placement tag as an Excel file, including all selected macros.
- Edit the placement details to make updates.
- View Analytics to access performance data.
- Delete the placement if it is no longer needed.

Upload Placements:
To create multiple placements at once, use the bulk upload feature.

Begin by downloading the sample Excel sheet and entering the desired placement names.

Then, select the appropriate creative within the 'Upload Placements' modal and upload the completed file.

All specified placements will be added accordingly.

To export the tag for a placement, click the 'Tag Export' icon to open the Tag Export modal.

1. From the drop-down menu ‘Add Macro’, select your Media Partner—this will automatically insert the appropriate macro into the ad tag.

2. Click the 'Copy' icon to copy the tag.
3. The modal also includes a shareable preview link.
4. Clicking the 'Analytics' icon will direct you to the Placement Analytics page.
5. Additionally, creative details are provided along with a QR code that allows you to preview the ad on a mobile device.


Next, choose the media partner and click 'Download'.

An Excel sheet containing the tags for the selected placements will be downloaded.
Tags and Implementation
Adctv is a creative management platform designed to help advertisers build CTV, Rich Media Display, and Video ads with a strong focus on user engagement.
The output from Adctv Studio is an ad tag that can be seamlessly implemented across various media partners, including DSPs, publishers, and ad networks.
AdCTV is a custom, rich media creative platform tailored for building HTML5 and VAST creative units.
- For CTV creatives, the output is a VAST tag.
- For Rich Media Display creatives, an INS tag is generated.
- For Interactive Video creatives, both an INS tag and a VAST tag are provided, allowing users to choose based on their preferred implementation.
Compatibility and Interactivity across VAST versions
Creative compatibility largely depends on the VAST version supported by the inventory, with VAST 4.0/4.2 (SIMID) offering the most robust support for interactive experiences. While our ad tags are designed to gracefully fall back to VAST 2.0, some interactive features may be limited at that level.
How do we offer interactivity on VAST 3.0 and above?
Our proprietary technology layer extends standard VAST 3.0 capabilities by implementing a sophisticated progressive fallback mechanism across Connected TV (CTV), Over-The-Top (OTT), and traditional video inventory.
At its core, the system employs a waterfall approach that initiates with SIMID (Secure Interactive Media Interface Definition), leveraging its secure iframe-based execution environment and comprehensive interactive capabilities. When SIMID support isn't detected, the system gracefully degrades to VAST 4.0, which maintains advanced functionality through native script execution and standardized APIs while supporting comprehensive verification features.
Should VAST 4.0 prove unavailable, the system falls back to VAST 3.0, where our proprietary extensions that are compliant with VAST3 APIs enable a custom interactive layer while maintaining compatibility with major ad servers and supporting essential interaction tracking. As a final fallback measure, the system defaults to VAST 2.0, ensuring universal compatibility by executing the creative as a standard linear video advertisement with basic impression and quartile event tracking.
This implementation is fully compatible with major demand-side platforms (DSPs) including Display & Video 360 (DV360), requiring only standard video codec support and HTTPS delivery capabilities from the player environment.
The ad response includes sophisticated conditional logic for format detection and server-side adaptation based on player capabilities, enabling real-time format negotiation. Our measurement framework maintains consistent tracking across all VAST versions while supporting extended metrics for interactive events when available.
The system optimizes performance through conditional loading of interactive assets and bandwidth-aware resource management, specifically tuned for the unique latency requirements of CTV and OTT environments. This comprehensive approach ensures maximum delivery capability while maintaining the highest possible level of interactive functionality across diverse video inventory types.
Exporting Ads in Adctv
Ad creation in Adctv is done using a drag-and-drop ad builder. After selecting the desired canvas size, the user is taken to the builder interface where they can choose from a variety of components to start building their ad.
Once the ad is complete, clicking the Export button generates the corresponding ad tag. This action opens the Tag Export modal, which provides several options for copying the tag.

Alternative Ways to Access and Copy the Ad Tag
From the Campaign Card
Option 1:
On the campaign card, click the "View Placements" link.


Click the Tag Export icon next to the desired placement to open the Tag Export modal.

- From the drop-down menu ‘Add Macro’, select your Media Partner—this will automatically insert the appropriate macro into the ad tag.
- Click the 'Copy' icon to copy the tag.
- The modal also includes a shareable preview link.
- Clicking the 'Analytics' icon will direct you to the Placement Analytics page.
- Additionally, creative details are provided along with a QR code that allows you to preview the ad on a mobile device.
In case you do not see the Macro of your preferred media partner in the list, please contact us and we will get it added within 24 hours.
Option 2:
On the campaign card, click "View Creatives" to go to the creative listing page.
Switch to the Placements tab to view all placements for that campaign.

Click the Tag Export icon next to the desired placement to open the modal and copy the tag.
From the Creative Card
On the creative card, click "View Placements".


Click the Tag Export icon next to the required placement to open the modal and copy the tag.
Next, choose the media partner and click 'Download'.
An Excel sheet containing the tags for the selected placements will be downloaded.