Product Guide
- Getting Started
- Introduction
- Overview of the Adctv Creative Builder
- Supported platforms (Desktop, Mobile, Interactive CTV)
- System requirements and browser compatibility
- Account Setup
- Interface Overview
- Creative Builder Fundamentals
- Project Set Up
- Working with Components
- Design Tools
- Building Ads from Adctv Templates
- Brand Kits
- Layouts
- Animation and Interactivity
- Campaign Management
- Analytics and Reporting
- Technical Guides
Getting Started
1. Getting Started
1.1 Introduction
- Overview of the Adctv Creative Builder
- Supported platforms (Desktop, Mobile, Interactive CTV)
- System requirements and browser compatibility
1.2 Account Setup
- Creating an account
- User roles and permissions
- Team management and collaboration features
1.3 Interface Overview
2. Creative Builder Fundamentals
2.1 Project Setup
- Creating a new project
- Choosing platform and dimensions
- Setting project properties
- Understanding safe zones and margins
- Managing project templates
2.2 Working with Components
- Component types (shapes, images, text, video)
- Component hierarchy and organization
- Component properties and styling
- Groups and nesting
- Component visibility and locking
2.3 Design Tools
- Shape tools and vector editing
- Text formatting and typography
- Image handling and optimization
- Color management and gradients
- Effects and filters
- Component library
- Layers
2.4 Responsive Design
- Creating responsive layouts
- Breakpoint management
- Dynamic scaling and positioning
- Platform-specific considerations
3. Animation and Interactivity
3.1 Timeline Basics
- Understanding the timeline interface
- Keyframes and tweening
- Animation properties
- Easing and timing functions
- Animation preview and playback
3.2 Advanced Animation
- Multi-layer animations
- Path animations
- Sprite sheets and frame-by-frame
- Transition effects
- Loop controls
3.3 Interactive Elements
3.4 Multi-page Navigation
- Creating multiple scenes/pages
- Navigation controls
- Transition effects between pages
- State management
- Progress tracking
4. Campaign Management
4.1 Campaign Structure
- Creating campaigns
- Campaign organization and hierarchy
- Campaign settings and properties
- Campaign duplication and templates
- Archive and restore options
4.2 Creative Management
- Adding creatives to campaigns
- Creative versions and variations
- Creative approval workflow
- Creative testing and preview
- Bulk operations
4.3 Placement Management
- Understanding placement types
- Creating and configuring placements
- Placement targeting options
- Scheduling and rotation
- Placement status monitoring
4.4 Tags and Implementation
- Tag generation process
- Tag types and formats
- Implementation guidelines
- Testing and validation
- Troubleshooting common issues
5. Analytics and Reporting
5.1 Analytics Overview
- Available metrics and KPIs
- Real-time vs. historical data
- Data collection methodology
- Custom event tracking
- Data export options
5.2 Campaign Analytics
- Campaign performance dashboard
- Conversion tracking
- Geographic distribution
- Device and platform breakdown
- Campaign comparison tools
5.3 Creative Analytics
- Creative performance metrics
- Interaction rates
- View-through rates
- A/B testing results
- Heat maps and interaction maps
5.4 Placement Analytics
- Placement-level reporting
- Delivery metrics
- Viewability tracking
- Site performance analysis
- Placement optimization
6. Best Practices and Guidelines
6.1 Design Best Practices
- Platform-specific guidelines
- Performance optimization
- Asset preparation
- Accessibility considerations
- Brand consistency
6.2 Technical Guidelines
- File size optimization
- Supported formats and codecs
- Browser compatibility
- Mobile considerations
- Load time optimization
6.3 Campaign Optimization
- Performance monitoring
- A/B testing methodology
- Optimization strategies
- Troubleshooting guide
- Case studies and examples
7. API and Integration
7.1 API Documentation
- Authentication and access
- Available endpoints
- Request/response formats
- Rate limits and quotas
- Error handling
7.2 Third-party Integrations
- Available integrations
- Setup and configuration
- Data synchronization
- Tracking implementation
- Custom integration options
8. Support and Resources
8.1 Help Center
- Frequently asked questions
- Troubleshooting guides
- Video tutorials
- Knowledge base articles
- Release notes
8.2 Support Options
- Technical support contact
- Feature requests
- Bug reporting
- Training resources
- Community forums
Introduction
Overview of the Adctv Creative Builder
Adctv Creative Builder is a powerful, user-friendly platform designed for creating custom Connected TV (CTV) and Rich Media display ads.
This tool allows for the creation of visually engaging and interactive advertisements efficiently.
The platform features a drag-and-drop interface that allows users to easily add and arrange components on their ad canvas. With just a few clicks, users can pull components directly from the Components List at the top and drop them onto the canvas, simplifying the ad creation process.
You can design and customize ads quickly without any technical knowledge.
The drag-and-drop functionality combined with the ability to manage multiple pages in one view greatly speeds up the ad creation process.
Additionally, the platform provides a shareable preview link for ads, and users can export their ads to obtain INS tags for display ads or VAST tags for video ads.
Supported platforms (Desktop, Mobile, Interactive CTV)
System requirements and browser compatibility
Account Setup
Creating an account
Once your Adctv Studio account is set up by the Account Servicing team, it will come with default settings. You can edit these settings as per your needs.
To begin running your campaigns, visit your Adctv domain and log in using your email ID and password.
On the Dashboard, go to the left-hand navigation bar and click on your name. Then, select User Profile. Here, you’ll see your account details, such as Name and Email ID.
You can also add your Contact Number or update any of the information as needed.
User roles and permissions
Team management and collaboration features
An Adctv Studio account can support multiple users. This helps in collaboration between teams. This article helps you with step-by-step instructions for adding and removing users and editing access of a user to your Adctv Studio account.
How to Add Team Members:
- Login to your Adctv domain.
- At the Dashboard, Go to Navigation Bar on the left and click on Team module.
- Click on New Member.

- Enter the First Name, Last Name, Email Address, and Password of the new member. Next, select the appropriate Role for the user.

- Once you've filled in the details, click Create to add the new team member to your organization.
- Once completed, the user will receive a confirmation email from Airtory. To accept the invitation, they should click the link provided in the email.
- Additionally, you have options to edit the details of a team member, change the password, or delete a member.

Interface Overview
Navigation and Layout
The Adctv Studio interface is designed for ease of use, with a clean layout and intuitive navigation.
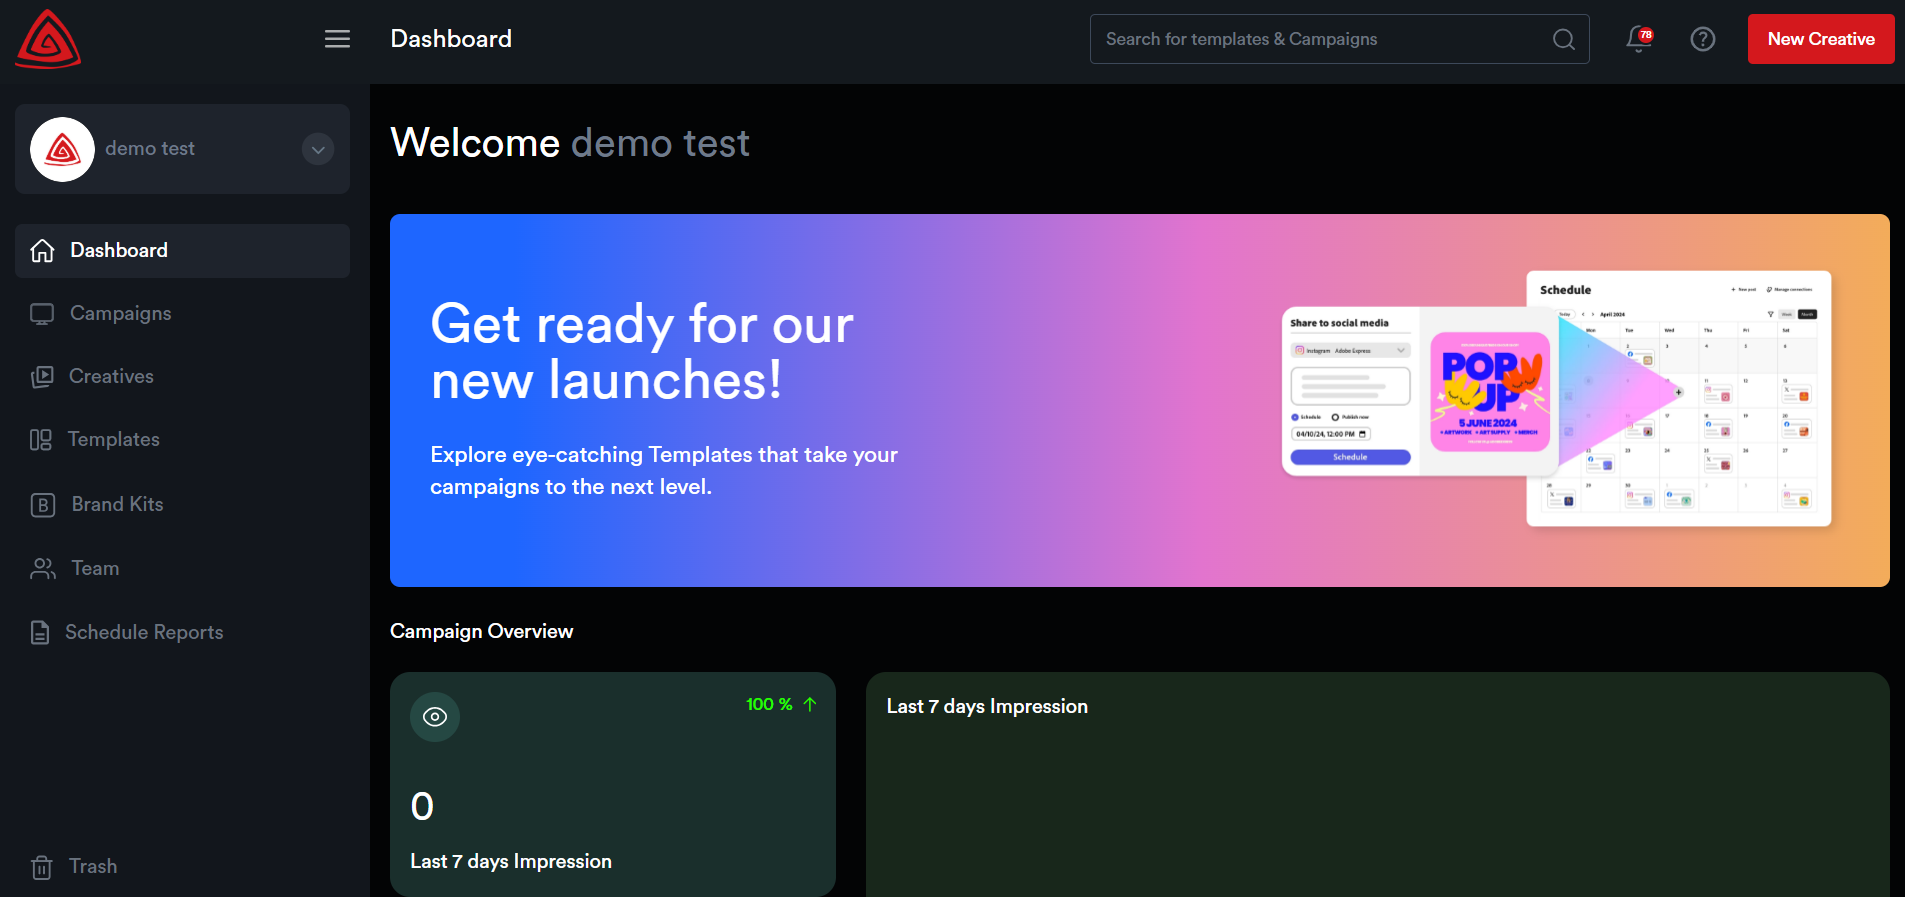
Left-Hand Navigation Menu:
On the left side of the screen, you’ll find the Navigation Menu, which allows quick access to key modules within the platform:
· Dashboard – Your homepage showing campaign stats, updates, and quick links.
· Campaigns – View, create, and manage all your advertising campaigns.
· Creatives – Manage and build your ad creatives here.
· Templates – Access pre-built templates to speed up creative development.
· Brand Kits – Store your brand assets such as logos, fonts, and color palettes.
· Team – Manage your team members and their roles.
· Schedule Reports – Set up and view scheduled campaign performance reports.
· Trash – Recover or permanently delete removed items.
Top Navigation Bar:
At the top, you’ll find: - A Search Bar to find templates or campaigns quickly. - A Notification Bell to view alerts. - Your User Profile dropdown (click on your name) to access profile settings. - A “New Creative” button to start building a creative from any screen.
Dashboard
The Adctv Dashboard provides a summary of campaign performance over the last 7 days within your organization, displaying key metrics such as impressions and CTR.
It also lists recently created creatives along with performance indicators and offers quick actions like preview and edit. Additionally, the dashboard highlights newly added templates, making it easy to start building creatives right away.
Campaigns
From here, you can create a new campaign. All previously created campaigns will be displayed here as individual cards.

Creatives
Here, all creatives belonging to an organization will be listed.

Templates
We offer a variety of predefined templates for ease of use, which will be listed here. Users can also create and save custom templates, and these will be displayed as well.

Brand Kits
The Brand Kits module allows you to store assets for multiple brands.

Users can effortlessly share their Brand Kit with collaborators via a unique link, granting them access to brand assets. Collaborators can upload logos, save color palettes, add fonts, and include other assets like images and videos.
This can be done by the Adctv user, or, once the kit is shared, the brand can upload assets themselves. No username or password is required for the brand to add items.
Team
This module allows you to manage team members. You can create new users, edit existing user details, delete users, and change passwords for team members as needed. This module helps you maintain control over your organization's user access and permissions

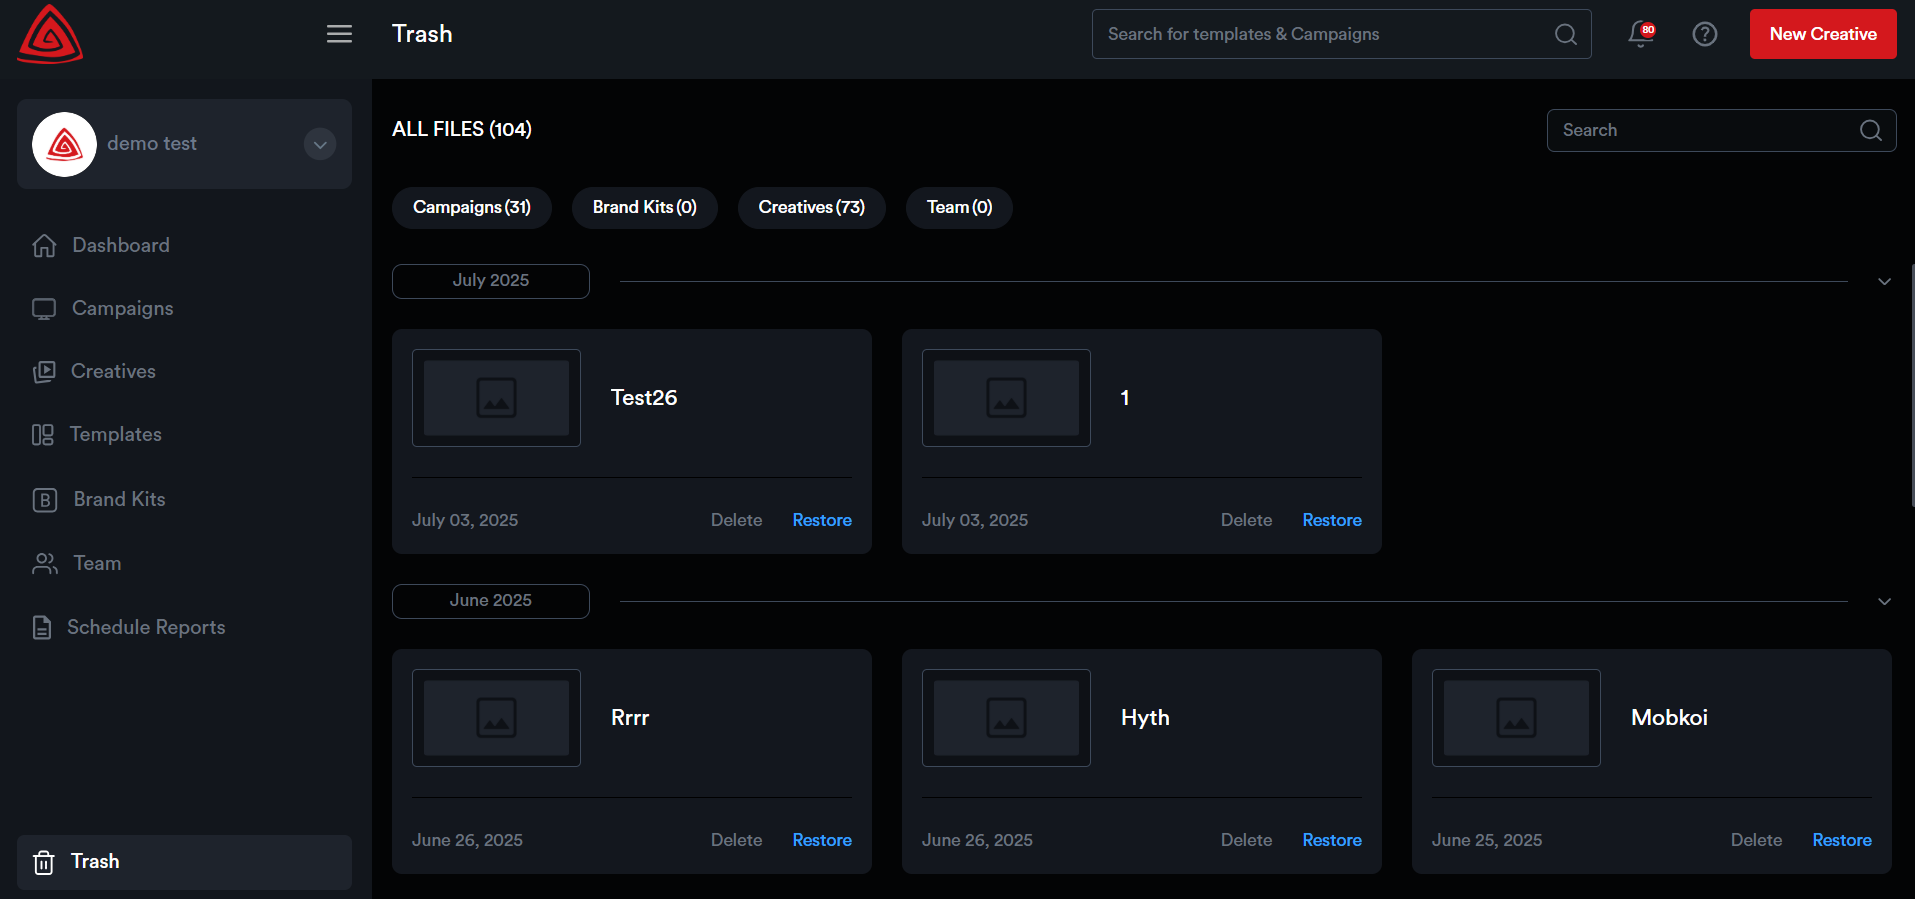
Trash
This module contains all deleted creatives, campaigns, and brand kits. Users can either permanently delete these items or restore them for future use.
Toolbar and panels
Adctv Creative Builder
Here is a quick walkthrough of the Adctv Creative Builder.
1. Canvas
Let’s start with the drag-and-drop ad builder. Here’s your canvas where you’ll be creating your ads.

It’s simple to get started, just drag and drop components from the Components(Interactive Widgets) list at the top directly into your canvas.
You can add new pages, view, and edit different pages/screens all in a single view.
2. Toolbar
The toolbar with various icons, each serving a unique purpose:

1 - Selector icon
2 - Add Basic elements
3 - Add Screens
4 - Add Interactive Widgets
5 - Text Element
6 - Asset Uploader
7 - Move Canvas
3. Layers Panel
Each component added to the canvas is automatically placed as a separate layer.

You can reorder layers by selecting the desired layer and dragging it to the preferred position.
Layers can be locked to prevent selection or editing. Locked layers are uneditable.
You have the option to hide or unhide a layer. Hidden layers become invisible on the canvas and cannot be selected or modified. To toggle visibility, click the corresponding icon.

Additionally, by right-clicking on any component within the canvas, you can duplicate it, delete it, undo or redo changes, copy its style, apply a quick animation, or send the layer to the front or back.

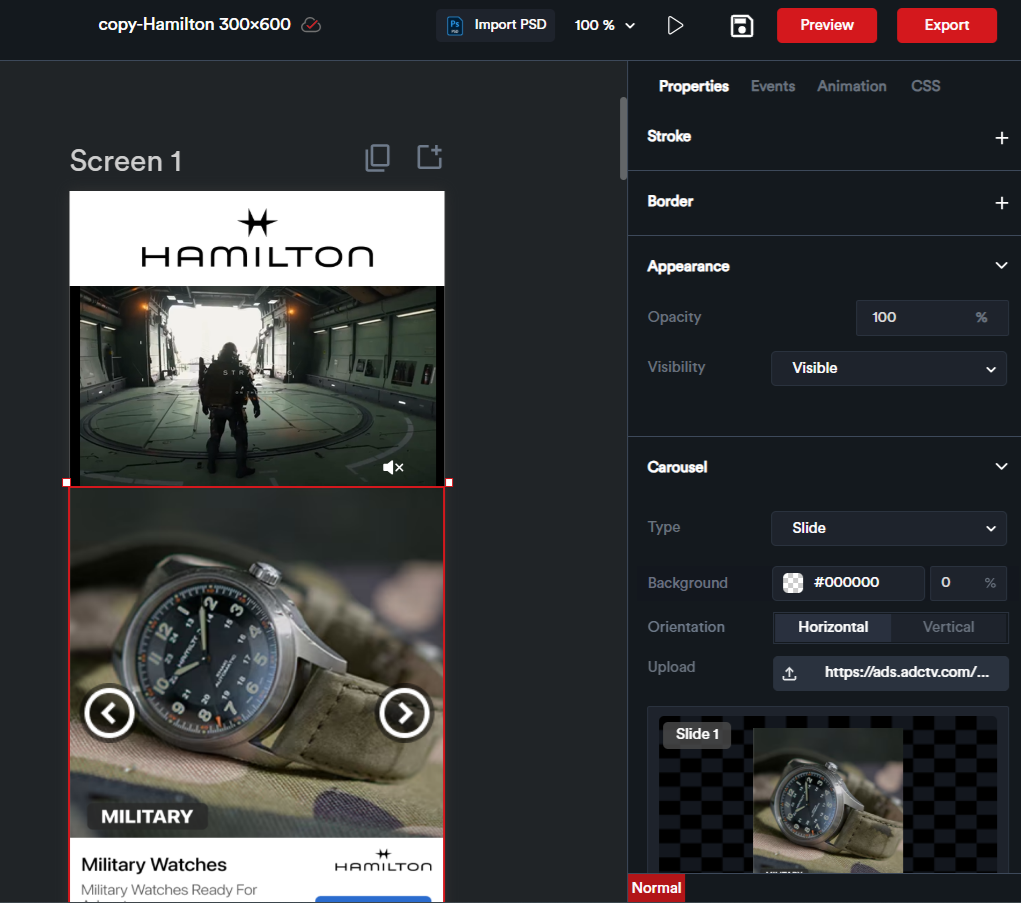
4. Properties Panel
After adding a component, click on it to open the properties panel on the right. Here, you can easily adjust settings such as size, color, position, and more.
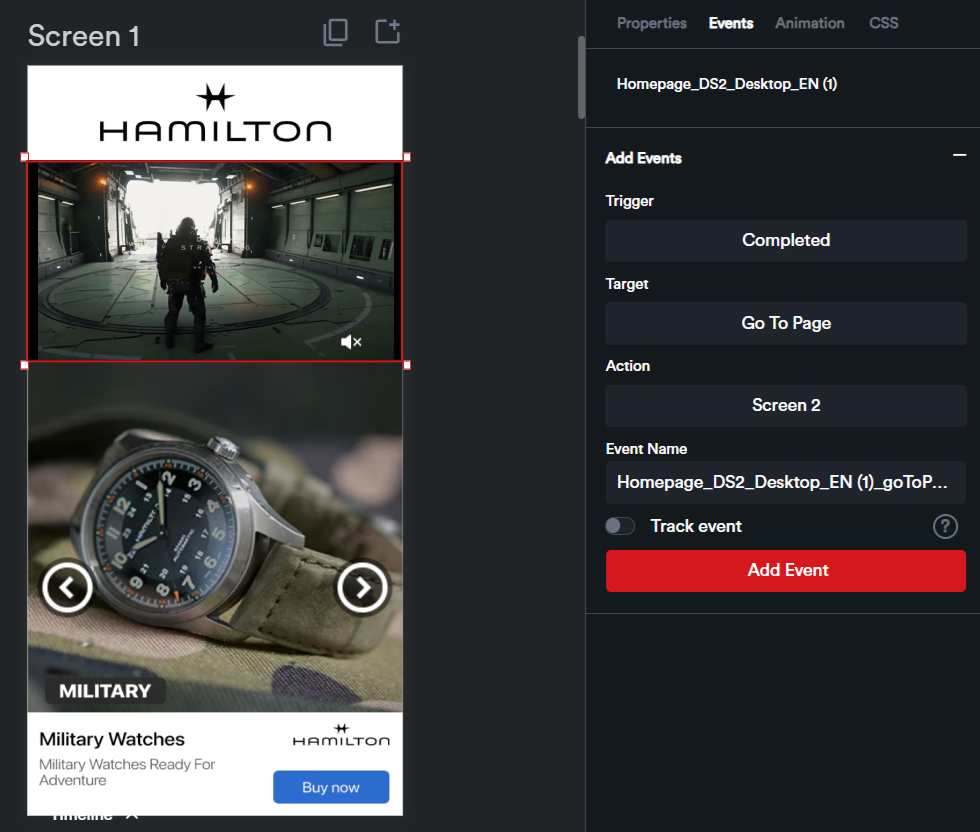
5. Events Panel
You can add events to control the behavior of your ad, such as defining actions triggered when a user clicks on an image or a button.
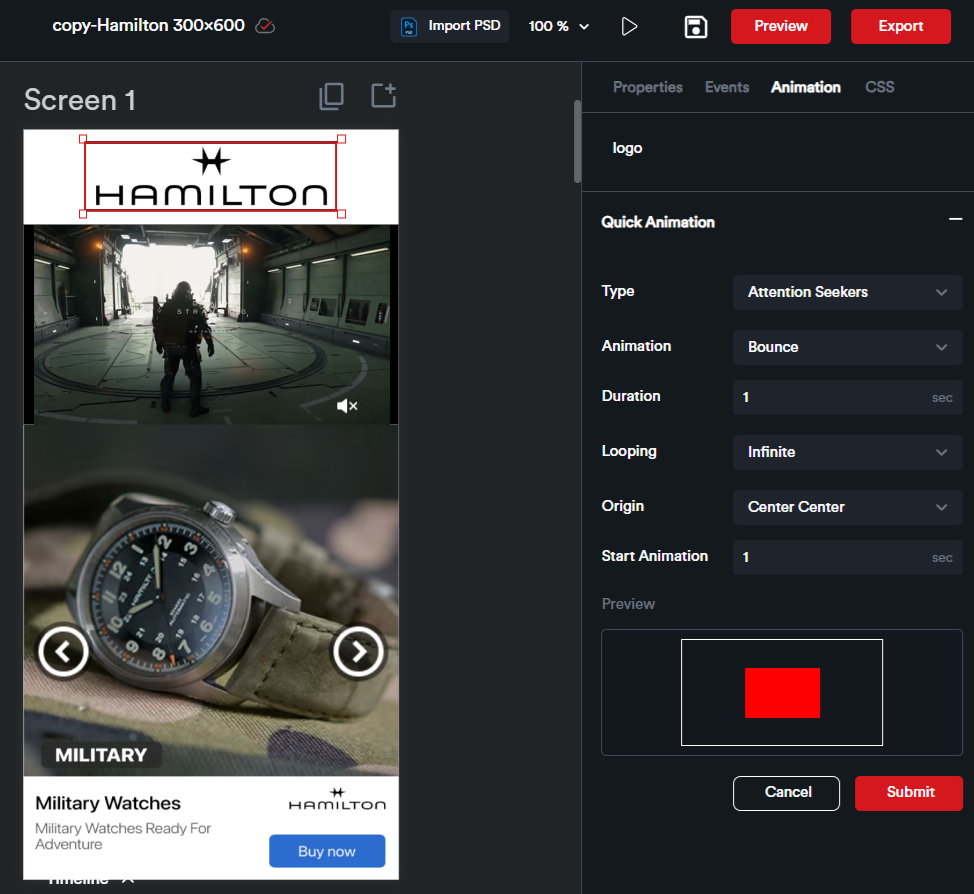
6. Animation Panel
Adctv offers a range of predefined Quick Animations for ease of use. From the Animation Panel, you can easily apply these animations to any element in your ad.
All the configured events will be listed here in the Events module.

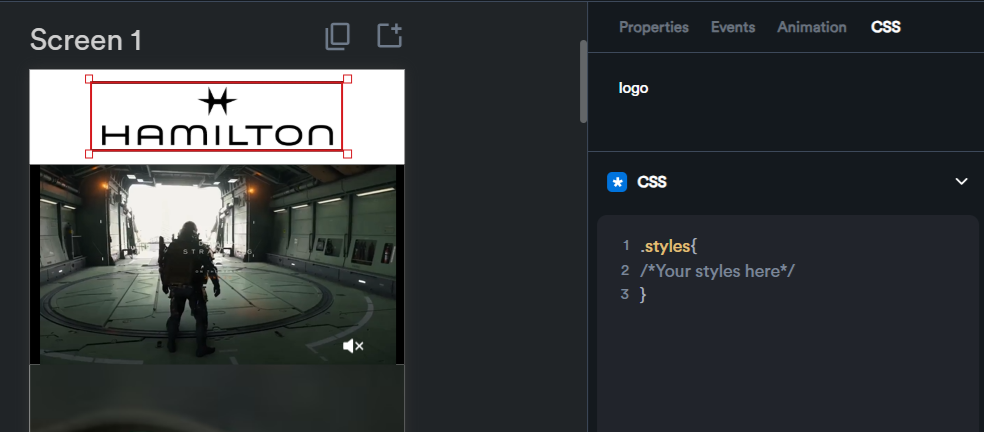
8. CSS Panel
The CSS Block allows you to add custom styling to any element in your ad.
8. Timeline Panel
Here, you can create complex animations and set up time-based events. Each component is represented as a layer on the timeline, allowing you to animate elements individually.
You can add keyframes to the timeline to indicate where your animation starts and ends.

9. Library
The Library panel displays the images, videos, and other assets that you're using or planning to use in your creative.
You can upload new assets anytime and store them for future use, making it simple to manage and reuse content across multiple pages.

10. Layouts
You can select and group multiple components to create a layout. The layout can be named, saved, and reused at any time.
This is especially useful for creating reusable sections, like a header or footer, that you can save and bring into your ads whenever you need them. Know More..
11. Templates
Here you’ll find templates that match your selected canvas size, so you can quickly pick one and start customizing it for your needs.
Just browse through the list and click ‘Add to Page’ to instantly add a template to your current creative. Know More..
12. Brand Kit
With the BrandKit module, you can easily store and manage assets for multiple brands. You can effortlessly share the Brand Kit with collaborators via a unique link, granting them access to brand assets. You can upload logos, save color palettes, add fonts, and include other assets like images and videos. Know More..
Creative Builder Fundamentals
Project Set Up
Building a new creative
To set up a new creative, click the 'New Creative' button, which is available globally on the Adctv platform.

This will open the 'New Creative' pop-up window.

1. You will see a list of available Ad Types—select the one that best suits your campaign.
The available options include Rich Media Display, Interactive Video, Interstitial Ads, and Interactive Connected TV (CTV).
Rich Media Display
Rich media display ads are visually engaging and include advanced elements like video, audio, and interactive features to capture user interest more effectively.
Interactive Video
Interactive video ads provide a dynamic platform for storytelling, allowing brands to convey their message thereby offering an effective way to capture audience attention, drive engagement, and achieve marketing objectives. Interstitial Ad
An interstitial ad is a type of full-screen ad that covers the interface of its host app or website.
Interactive CTV Ads
Interactive Connected TV ads are tailored for streaming platforms accessed via smart TVs, gaming consoles, and streaming devices (like Amazon Fire TV or Apple TV). These ads often incorporate interactive components to enhance viewer engagement.
2. Enter the Creative Name
3. Enter the Campaign Name, Advertiser Name, and Publisher Name. - If the campaign name you enter already exists, the advertiser and publisher fields will auto-populate.
4. Enable Responsive Layout (optional) – Check this box if you want the creative to be built with a responsive layout that adapts to various screen sizes.
5. Choose Canvas Size: Select from predefined ad dimensions or input custom dimensions as required.
Once all necessary details are filled out, click the "Create" button. You will then be redirected to the Drag and Drop Ad Builder, where you can begin building your ad.
👉 Want to customize your projects? Know about the Adctv Creative Builder to get started.
Working with Components
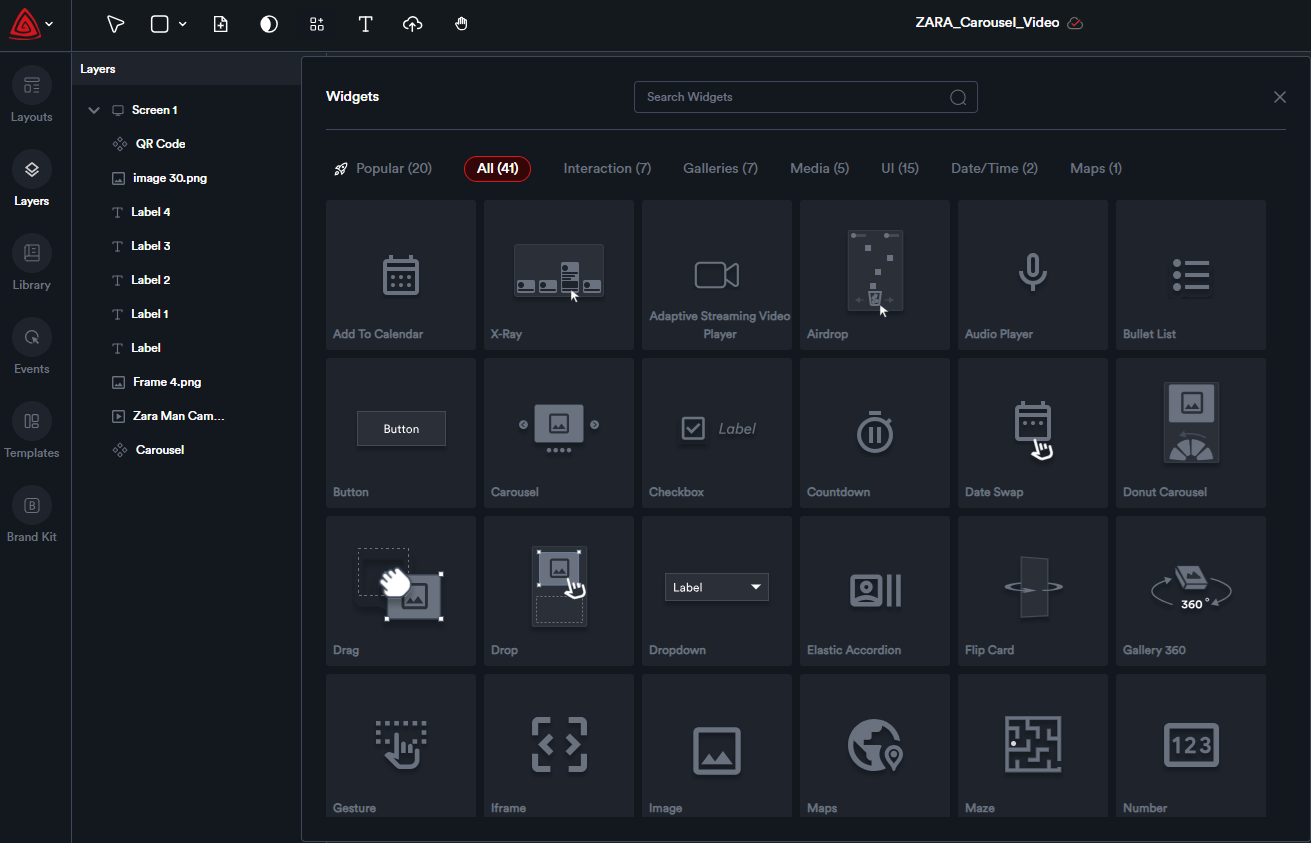
The Components (Interactive Widgets) panel is accessible from the top toolbar.

Getting started is easy—simply drag and drop any component from the list onto your canvas based on the needs of the creative you’re building.
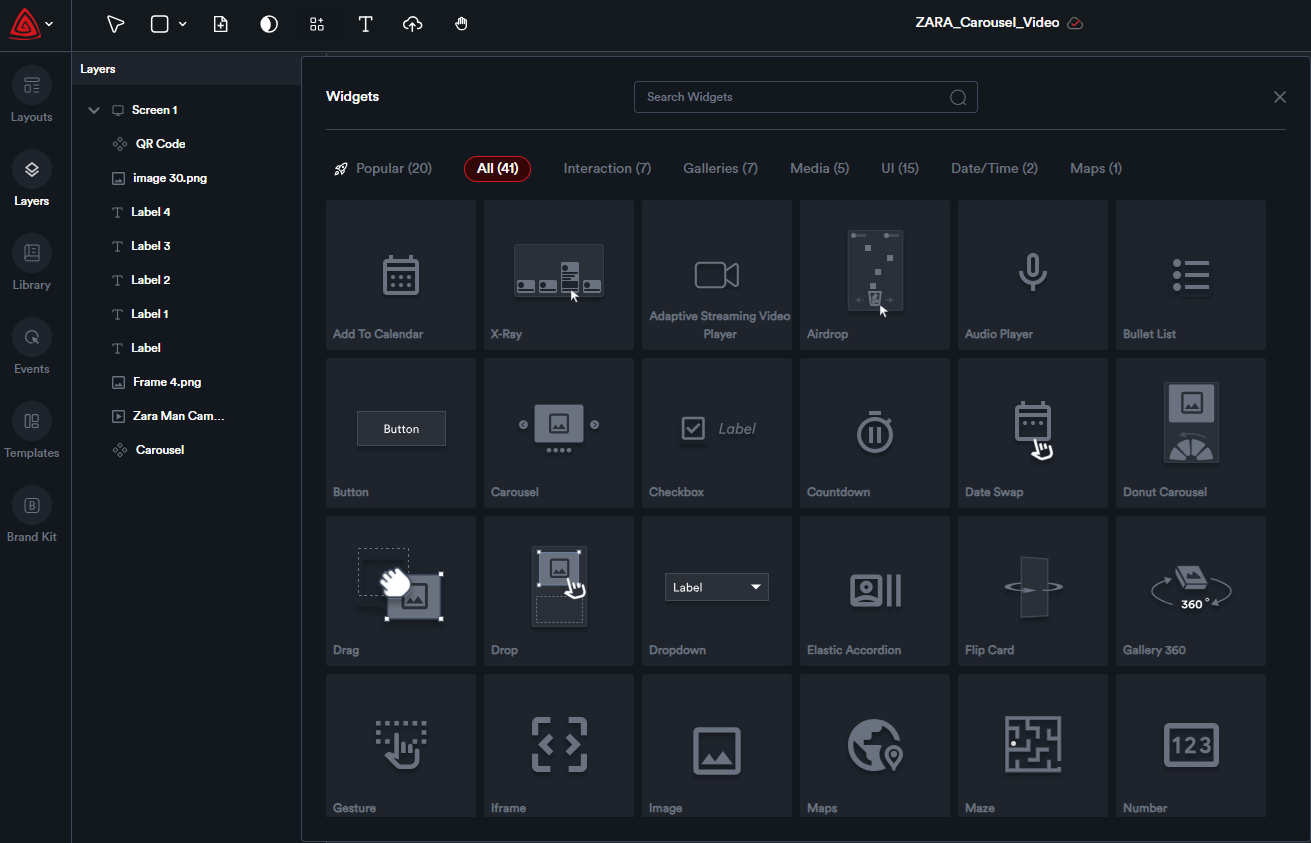
Below is the list of widgets available within the Adctv platform.
Design Tools
Building Ads from Adctv Templates
Adctv offers a collection of built-in templates for both Rich Media Display and Connected TV (CTV) ad formats. If starting from a blank canvas feels complex or time-consuming, you can simply select a pre-designed template that suits your creative needs, customize it with your own assets, and quickly build your ad with minimal effort.
Even when using a template, you have full creative flexibility. You can:
- Move and reposition elements such as logos
- Rearrange components to match your desired layout
- Add or remove elements as needed
- Incorporate animations for enhanced visual impact
Selecting a Template
Within the Template module, browse and select your preferred template.
Screenshot Pending
Templates are organized by Ad Type, and you can use filters to narrow your options by:
- Ad Size
- Ad Category (e.g., responsive, expandable)
- Components Used
Screenshot Pending
Click on any template to view its details in a pop-up. To preview the template, simply click ‘Preview Template’.
Screenshot Pending
Once you've found the right template, click ‘Use This Template’. You’ll be prompted to enter your creative details in the New Creative pop-up. After filling in the necessary information, click ‘Create’ to get started with customizing your ad using the Drag-and-Drop Builder.
When your creative is complete, click ‘Export’ to generate the final ad tag.
Saving a Creative as a Template
You have two options to save a creative as a template:
1. From the Editor Page:
While on the editor page of your creative, open the navigation menu and select ‘Save as Template’. A pop-up will appear prompting you to enter a name for your template. Click ‘Create’ to save it. All templates you create will be stored under Templates > My Templates, where you can view or customize them as needed.

2. From the Creative Card
You can also save a creative as a template without opening the editor. Open your campaign and locate the creative you want to convert. On the creative card, click the ‘Save as Template’ icon. A pop-up will appear, allowing you to name the template. Click ‘Create’ to save it.

Adding a Template to Your Creative
Within the builder, you have the option to add a template to your current creative. On the left-hand side, you’ll find the Templates module.

This module displays templates that match your selected canvas size, making it easy to choose one that fits your layout.
Simply browse through the available templates and click ‘Add to Page’ to instantly insert it into your creative for further customization.

Brand Kits
The BrandKit module allows you to seamlessly store and manage assets for multiple brands in one place.
Easily upload logos, define color palettes, add fonts, and include other media such as images and videos.
On the Dashboard, click ‘Brand Kits’ from the navigation bar on the left.

To create a new Brand Kit, click on ‘New Brand Kit’, enter a name, and then click ‘Create’.

You're now inside the Brand Kit. Here, you can add logos, fonts, colors, images, and videos to customize your brand kit.
Click ‘Add Logo’ to upload your brand logos.


Click ‘Add Fonts’ to select and upload font files.

For each font added to the kit, users can create a variant, duplicate it, or delete it. Fonts can also be categorized by setting them as Heading, Subheading, Body, Button Text, Custom, or None.

Under the Color Palette section, use the color picker to select and save individual colors, or create complete color palettes.


In the Images section, users can upload and save image assets for the brand.

These assets can also be organized into different groups. To create a group, click on ‘Create Group’, enter a name, and upload images directly from the popup.

Each uploaded image includes options to Rename, Move to Group, Replace, Duplicate, or Delete.

In the Videos section, users can upload and save video assets for the brand. These assets can also be organized into different groups.

To create a group, click on ‘Create Group’, enter a name, and upload videos directly from the popup. Each uploaded video includes options to Rename, Move to Group, Replace, Duplicate, or Delete.
Each Brand Kit comes with the following options:

1. Rename – Change the name of a Brand Kit.
2. Copy – Create a duplicate of the Brand Kit.
3. Move to Folder – Organize Brand Kits into folders. To create a new folder, click ‘New Folder’ and enter a name. Then, use the ‘Move to Folder’ option to place the Brand Kit into an existing folder.

- Edit Link – Allows collaborators to upload assets to the Brand Kit.
- View Link – Grants view-only access to the kit without the ability to upload or edit assets.

5. Delete – to remove the Brand Kit.
Layouts
You can select and group multiple components to create a custom layout. Once created, the layout can be named, saved, and reused anytime.
This is particularly helpful for building reusable sections—such as headers or footers—that you can easily insert into your ads whenever needed.
For example, here I have a description text, a QR code, and a CTA text.

To turn these into a custom layout, start by selecting all three elements—hold the Shift key while clicking on each one. Then, click the ‘Create Group’ icon at the top to group them together.

Next, click on the ‘Create or Edit Component’ button to begin creating your custom layout.

Give your layout a name and upload a thumbnail image. Once you're done, click ‘Create’ to save it.

The saved layout will be available in the Layouts module within the creative editor page and can be reused in any future creatives.

Animation and Interactivity
Timeline
The timeline provides a visual interface for organising and controlling how elements appear, move, and interact in an animation. It has three main sections: the Header, which includes tools like the timer, zoom, and playback toggles; the Timeline Elements panel on the left, for managing screens, events, layers, and quick animations; and the Timeline Panel on the right, offering detailed controls for keyframes, spans, easing, and events.
Together, these sections let users sequence, edit, and fine-tune animations efficiently and intuitively, making complex interactions easier to create and manage.
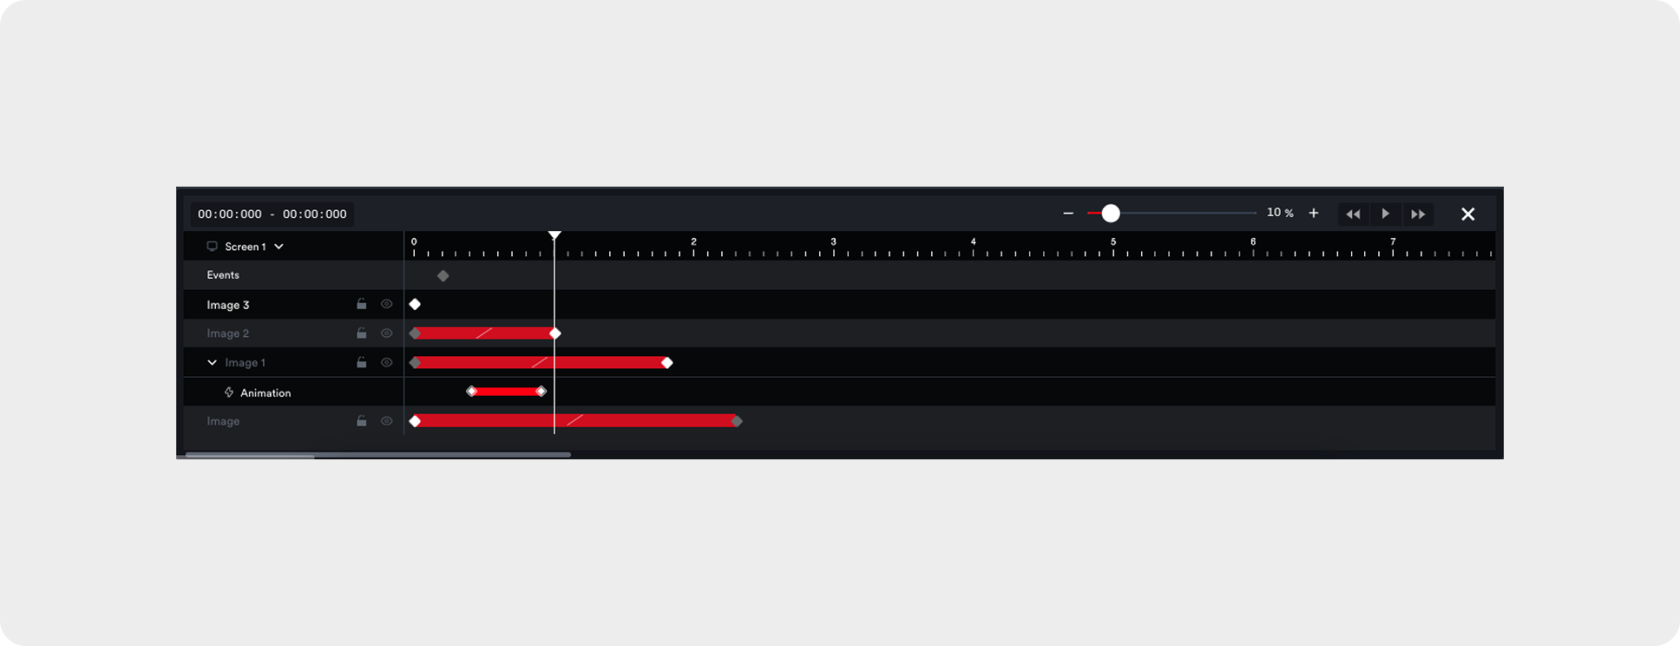
Header
The header provides essential controls for managing the timeline. It includes a Timer to display the current playback time and total duration, a Zoom slider for adjusting the timeline view and focusing on specific sections, and Toggle buttons to play, pause, or navigate forward/backward in small increments. Together, these tools allow users to monitor, control, and navigate the animation efficiently.
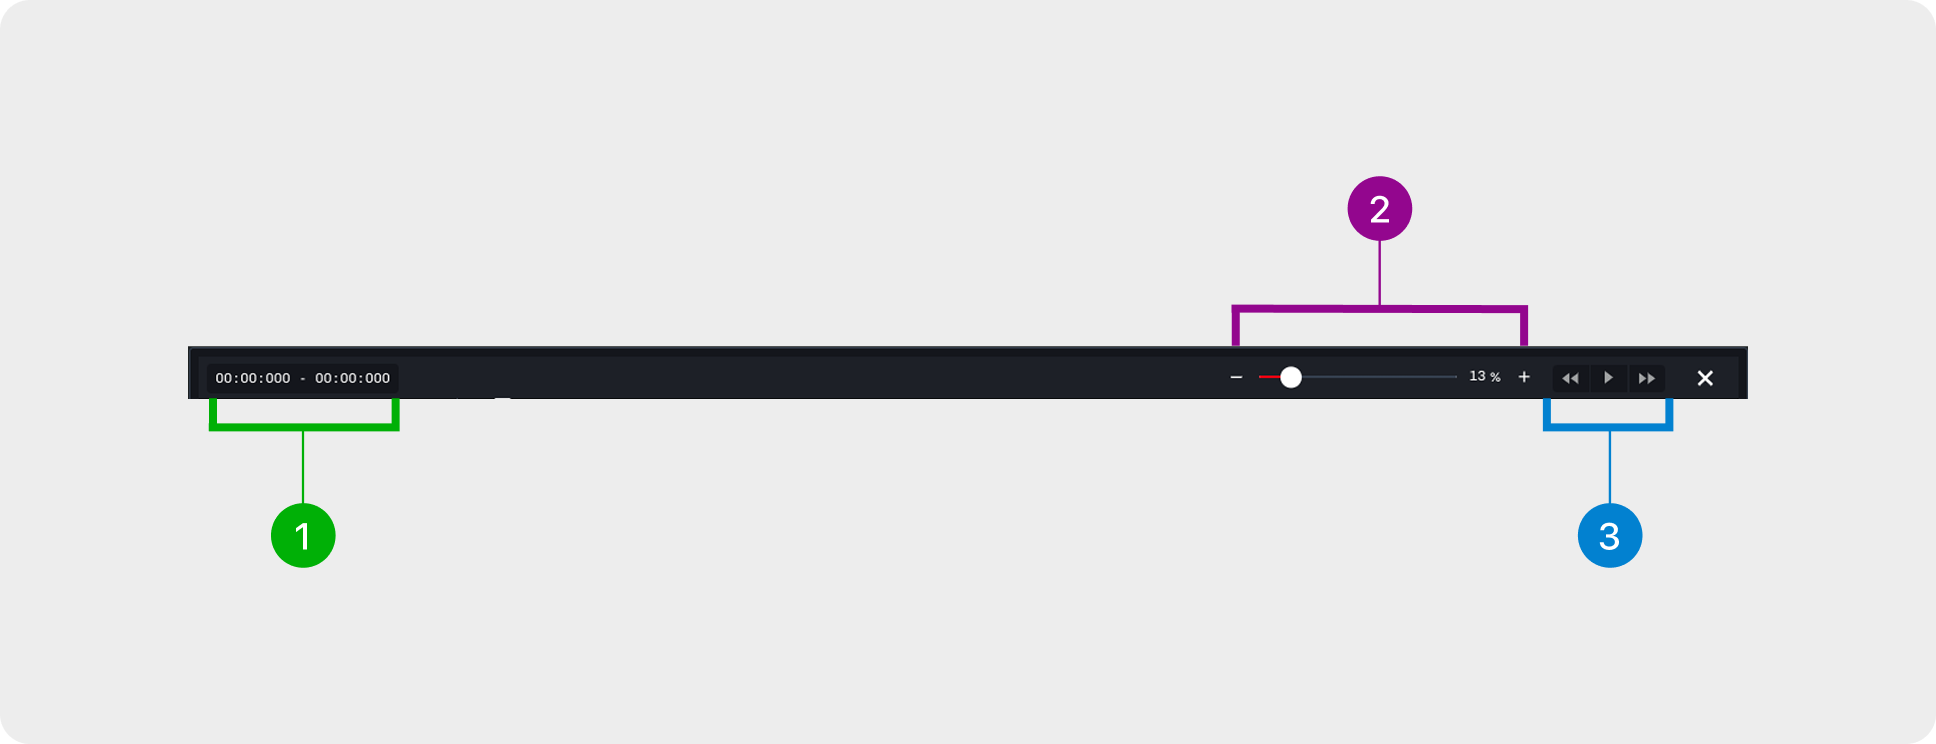
1. Timer
Displays the current playback time alongside the total duration of the animation, helping users track progress within the timeline.
2. Zoom
Adjusts the timeline view, allowing users to focus on specific sections or see the animation in full for better navigation.
3. Toggle
Allows users to play or pause the animation and jump 100 ms backward or forward, enabling precise navigation within the timeline.
Elements
Displays the structure of the animation, including screens, events, layers, and quick animations. It helps users organize, manage, and navigate different components of the timeline. Users can perform actions like renaming, configuring, or deleting elements, making it easier to keep the animation well-structured and accessible
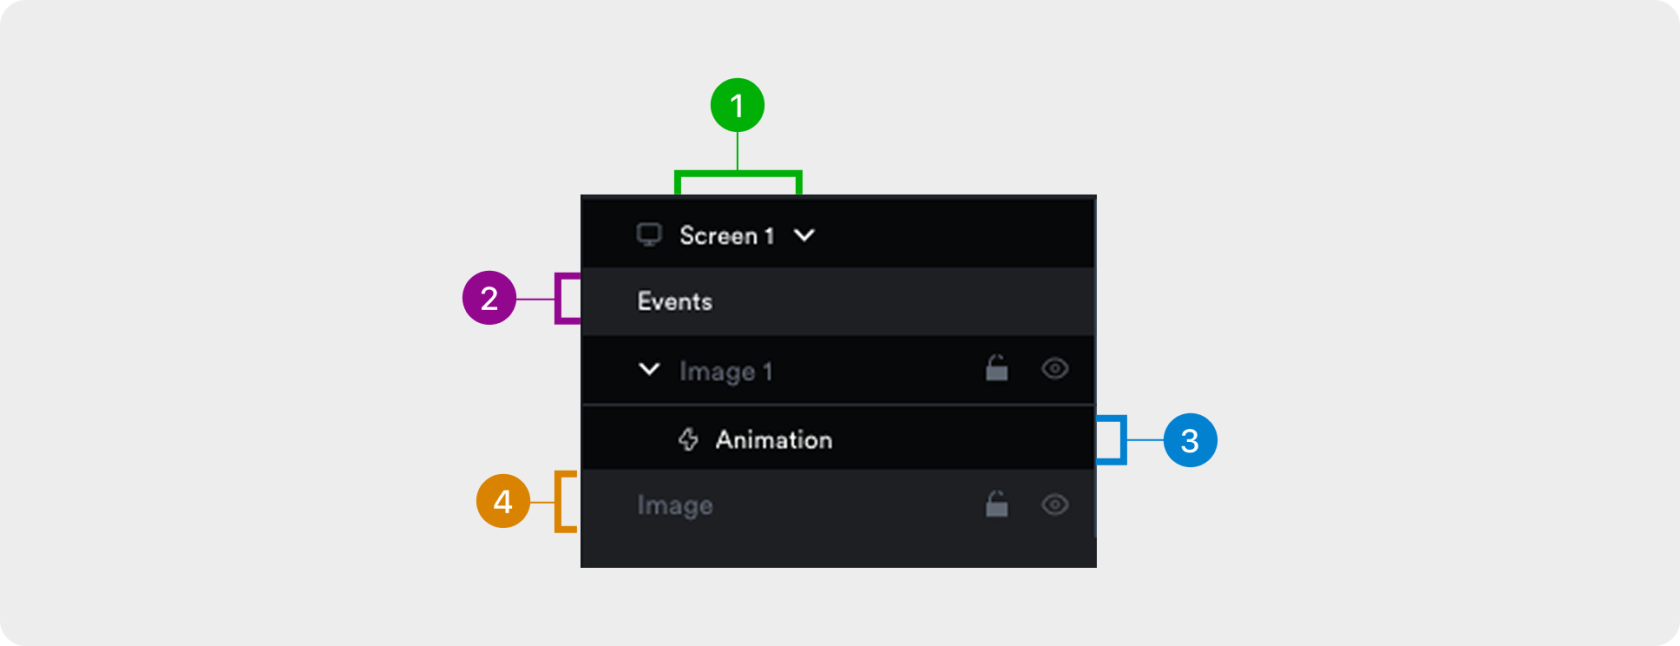
1. Screens
Lists all design screens, letting users switch between them to view and edit each screen’s timeline.
2. Events
Defines timeline triggers that control playback such as play, pause, restart, or jump or activate actions in other elements.
3. Animations
Shows quick animations applied to elements, displayed as sublayers under their respective layers for easy management.
4. Layers
Lists all elements on the screen, allowing users to arrange their order and manage visibility with the 
or lock them with the  to prevent edits.
Panel
Displays the timing and duration of elements within the animation. It helps users manage keyframes, spans, animations, easing, and events to fine-tune playback. This section focuses on controlling motion, transitions, and sequencing for smooth, precise animations.

1. Events
Marks points in the timeline that trigger actions. Right-click an event to delete it, configure it, or set a label.
2. Keyframes
Marks the start and end values of properties to create motion or change. Right-click the timeline to add a keyframe, or right-click a keyframe to delete it.
3. Easing
Adjusts the acceleration and deceleration between keyframes for smoother transitions. Right click on the easing option icon to access the easing options.
4. Animations
Displays quick animations as sublayers under element layers, allowing users to adjust their position on the timeline.
5. Span
Shows the duration between keyframes, controlling how long a change takes.
Campaign Management
Campaign Structure
To get started, click on the Campaigns module in the navigation bar on the left side. This will take you to the All Campaigns page, where all your campaigns are displayed as visually appealing cards.

To create a new campaign, click on the New Campaign button. Enter the campaign name, advertiser name, and publisher name. Then, click Create to set up your campaign.


Each campaign card will display key information, including the campaign's creation date, advertiser name, publisher name, last modified date, and important metrics like lifetime impressions, views, clicks, and CTR.
Additionally, the campaign cards include buttons that take you directly to the Creatives listing page, Placements listing page, and Campaign Analytics page.
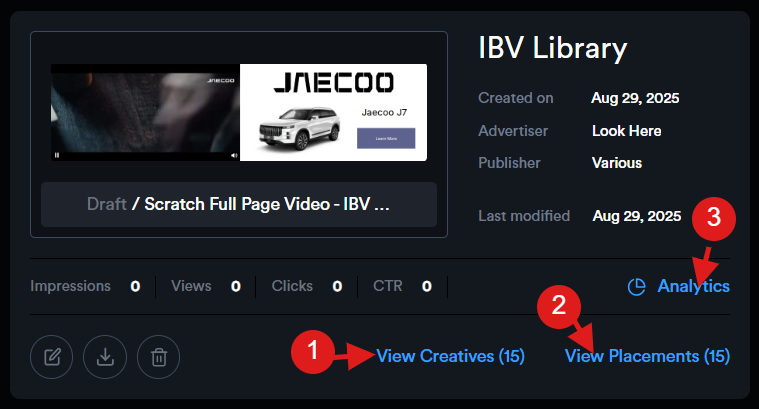
You can also edit, delete, or download the tags associated with a campaign.
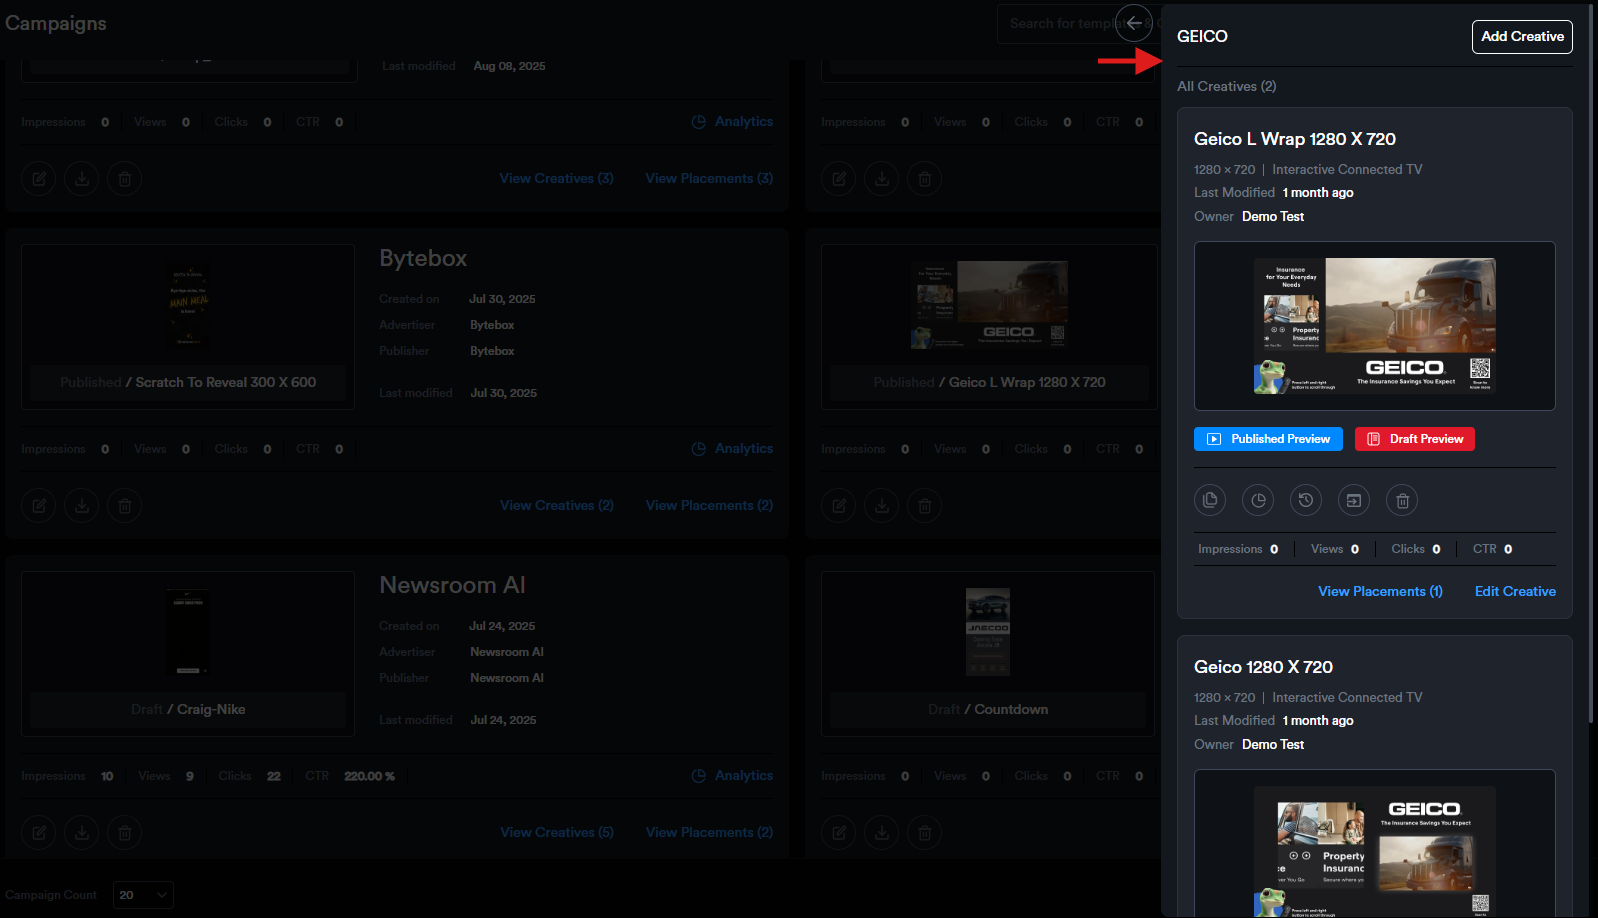
Campaign Preview: By clicking on a campaign thumbnail, you'll be directed to a preview page where all the campaign creatives are listed, allowing users to quickly scroll through and view them.
Creative Management
Adding a New Creative to a Campaign
To add a new creative to a campaign, click the "Add Creative" button.

This will open the New Creative modal, where you can enter the required creative details. Campaign information will be auto-filled.

- Select the Ad Type – Choose from the available options: Rich Media Display, Interactive Video, Interstitial, or Interactive Connected TV, depending on the format you wish to build.
- Enter a Creative Name – Provide a name to help identify your creative.
- Enable Responsive Layout (optional) – Check this box if you want the creative to be built with a responsive layout.
- Choose Canvas Size – Select from predefined ad dimensions or enter custom dimensions as needed.
Once all necessary details are filled out, click the "Create" button. You will then be redirected to the Drag and Drop Ad Builder, where you can begin building your ad.
Viewing and Managing Creatives within a Campaign
Once added, creatives are displayed as individual cards within the campaign view.

Each creative card provides key details, including:
- Last Modified Date
- Creative Owner
- Performance Metrics: Lifetime impressions, views, clicks, and click-through rate (CTR)
Users have access to the following actions on each creative card:
- Preview Draft and Preview Published versions
- Edit Creative
- Duplicate Creative
- View Analytics
- View Activity
- Save as Template
- Delete Creative
Additionally, each card includes a button to navigate directly to the Placements Listing page associated with that creative.
Placement Management
How to Assign A Creative to Multiple Placements
What is a Placement?
Placements is a new creative management method within Adctv allowing for a more granular view of different creatives in campaigns.
Each creative setup will by default be assigned against a Placement and the Tags will now be generated at the Placement level.
A single creative can now be assigned to multiple Placements and each Placement Tag can be provided to different media partners. This allows better tracking of the performance and optimizing accordingly.
Accessing and Managing Placements within a Campaign
To view the list of placements associated with a campaign, navigate to the campaign card and click on "View Placements." This will open a sidebar displaying all placements linked to that campaign.

To create a new placement for a creative, click the "New Placement" button.

Provide the Placement Name and select the Insertion Type, then click "Add Placement" to save.

Each placement includes a set of action buttons under the Action section, allowing you to:
- Export the placement to view the tag and preview.
- Download the placement tag as an Excel file, including all selected macros.
- Edit the placement details to make updates.
- View Analytics to access performance data.
- Delete the placement if it is no longer needed.

Upload Placements:
To create multiple placements at once, use the bulk upload feature.

Begin by downloading the sample Excel sheet and entering the desired placement names.

Then, select the appropriate creative within the 'Upload Placements' modal and upload the completed file.

All specified placements will be added accordingly.

To export the tag for a placement, click the 'Tag Export' icon to open the Tag Export modal.

1. From the drop-down menu ‘Add Macro’, select your Media Partner—this will automatically insert the appropriate macro into the ad tag.

2. Click the 'Copy' icon to copy the tag.
3. The modal also includes a shareable preview link.
4. Clicking the 'Analytics' icon will direct you to the Placement Analytics page.
5. Additionally, creative details are provided along with a QR code that allows you to preview the ad on a mobile device.


Next, choose the media partner and click 'Download'.

An Excel sheet containing the tags for the selected placements will be downloaded.
Tags and Implementation
Adctv is a creative management platform designed to help advertisers build CTV, Rich Media Display, and Video ads with a strong focus on user engagement.
The output from Adctv Studio is an ad tag that can be seamlessly implemented across various media partners, including DSPs, publishers, and ad networks.
AdCTV is a custom, rich media creative platform tailored for building HTML5 and VAST creative units.
- For CTV creatives, the output is a VAST tag.
- For Rich Media Display creatives, an INS tag is generated.
- For Interactive Video creatives, both an INS tag and a VAST tag are provided, allowing users to choose based on their preferred implementation.
Compatibility and Interactivity across VAST versions
Creative compatibility largely depends on the VAST version supported by the inventory, with VAST 4.0/4.2 (SIMID) offering the most robust support for interactive experiences. While our ad tags are designed to gracefully fall back to VAST 2.0, some interactive features may be limited at that level.
How do we offer interactivity on VAST 3.0 and above?
Our proprietary technology layer extends standard VAST 3.0 capabilities by implementing a sophisticated progressive fallback mechanism across Connected TV (CTV), Over-The-Top (OTT), and traditional video inventory.
At its core, the system employs a waterfall approach that initiates with SIMID (Secure Interactive Media Interface Definition), leveraging its secure iframe-based execution environment and comprehensive interactive capabilities. When SIMID support isn't detected, the system gracefully degrades to VAST 4.0, which maintains advanced functionality through native script execution and standardized APIs while supporting comprehensive verification features.
Should VAST 4.0 prove unavailable, the system falls back to VAST 3.0, where our proprietary extensions that are compliant with VAST3 APIs enable a custom interactive layer while maintaining compatibility with major ad servers and supporting essential interaction tracking. As a final fallback measure, the system defaults to VAST 2.0, ensuring universal compatibility by executing the creative as a standard linear video advertisement with basic impression and quartile event tracking.
This implementation is fully compatible with major demand-side platforms (DSPs) including Display & Video 360 (DV360), requiring only standard video codec support and HTTPS delivery capabilities from the player environment.
The ad response includes sophisticated conditional logic for format detection and server-side adaptation based on player capabilities, enabling real-time format negotiation. Our measurement framework maintains consistent tracking across all VAST versions while supporting extended metrics for interactive events when available.
The system optimizes performance through conditional loading of interactive assets and bandwidth-aware resource management, specifically tuned for the unique latency requirements of CTV and OTT environments. This comprehensive approach ensures maximum delivery capability while maintaining the highest possible level of interactive functionality across diverse video inventory types.
Exporting Ads in Adctv
Ad creation in Adctv is done using a drag-and-drop ad builder. After selecting the desired canvas size, the user is taken to the builder interface where they can choose from a variety of components to start building their ad.
Once the ad is complete, clicking the Export button generates the corresponding ad tag. This action opens the Tag Export modal, which provides several options for copying the tag.

Alternative Ways to Access and Copy the Ad Tag
From the Campaign Card
Option 1:
On the campaign card, click the "View Placements" link.


Click the Tag Export icon next to the desired placement to open the Tag Export modal.

- From the drop-down menu ‘Add Macro’, select your Media Partner—this will automatically insert the appropriate macro into the ad tag.
- Click the 'Copy' icon to copy the tag.
- The modal also includes a shareable preview link.
- Clicking the 'Analytics' icon will direct you to the Placement Analytics page.
- Additionally, creative details are provided along with a QR code that allows you to preview the ad on a mobile device.
In case you do not see the Macro of your preferred media partner in the list, please contact us and we will get it added within 24 hours.
Option 2:
On the campaign card, click "View Creatives" to go to the creative listing page.
Switch to the Placements tab to view all placements for that campaign.

Click the Tag Export icon next to the desired placement to open the modal and copy the tag.
From the Creative Card
On the creative card, click "View Placements".


Click the Tag Export icon next to the required placement to open the modal and copy the tag.
Next, choose the media partner and click 'Download'.
An Excel sheet containing the tags for the selected placements will be downloaded.
Analytics and Reporting
Campaign Analytics
To view analytics for a Campaign:

You’ll see a campaign summary along with individual creative analytics displayed on each creative card.
The default date range for which the Analytics are displayed on this page is the last seven days. The date range can be modified by selecting from the date range picker.


Scroll down to the ‘Full Event List’ table to view data for individual metrics.
To download the report, click the Download button to export the data in Excel format.

If you scroll down, you will see the hourly breakdown statistics displayed both as a graph and in a table. Hourly reports are available only on a per-day basis.


Creative Analytics
For detailed analytics on a specific creative, either:
Click directly on the creative summary card on the campaign analytics page, which will take you to the Creative Analytics page, or

Open the campaign and navigate to the analytics page from the selected creative card.


Placement Analytics
To view analytics at the Placement level:
Go to the Placements panel and click the Analytics icon for the placement. This will take you to the Placement Analytics page of that placement.

Alternatively, you can click View Placements on the creative card to see all placements for that creative. From there, click the Analytics icon to view the analytics for a specific placement.


Analytics glossary
CAMPAIGN ANALYTICS
Campaign Summary

Impression - Number of times the Ad is loaded in an active tab
Views - An Impression is considered Viewable when 50% of the ad is in the viewport of the device for 1 continuous second.
Click Through Rate - Clicks/(Impressions - Invalid Impressions)] * 100
Clicks - When a user clicks on an ad to be redirected to a Landing Page. These are unique per impression.
Creatives:

Compare Data Points:

CREATIVE ANALYTICS


Impression – No. of times the Ad is loaded in an active tab.
View – No. of times the Ad has been viewed by the users. An Impression is considered Viewable when 50% of the ad is in the viewport of the device for 1 continuous second.
Engagement - Triggers for the first interaction per Impression.
Time Spent - Total time spent (in seconds) on the ad starts when a user interacts with the ad till the user interacts outside the ad / when the ad goes out of view.
Exposure - The total duration (in milliseconds) for which an ad is viewable in the user's viewport.
Adctv ad initialized - No. of times the Ad with interactive elements has been loaded. This event indicates that the necessary resources for the ad, such as images, videos, or interactive elements, have been fetched and initialized, and the ad is ready to be shown to the user.
Video Start – No. of times the video playback has been initiated.
First Quartile– No of times that 25% of the video has been viewed.
Mid Point – No of times that 50% of the video has been viewed.
Third Quartile – No of times that 75% of the video has been viewed.
Complete – No. of times the video has been completely viewed.
Pause – No. of times the video has been paused.
Resume – No. of times the video has been resumed.
Mute – No. of times the video has been muted.
Unmute– No. of times the video has been unmuted.
Clicks – No. of times the user clicked on the Ad and it was redirected to a landing page.
QR Scan – No. of QR code scans
Technical Guides
Variables From Tags to_Custom_Codes
This document explains how to define variables inside INS tags and VAST tags, and how these variables are accessed inside your custom methods.
It also includes syntax, examples, naming conventions, usage flow, and best practices.
1. Overview
Variables allow you to pass dynamic values from the ad tag (INS or VAST) directly into your custom code logic.
You can control creative behavior such as:
- Colors
- Text
- URLs
- Durations
- Images & assets
- Screen properties
- Widget-level properties
This helps make creatives dynamic without re-uploading or editing visuals.
2. Variables in INS Tags
data-var-{name}="{value}"
Rules
- Replace {name} with your variable name
- Replace {value} with your desired value
- Use lowercase, hyphen-friendly variable names
- Add unlimited variables
- All variables become available in your custom code
<ins id="adctv"
class="adctv-ads"
data-tenant="1"
data-cdn="https://ads.adctv.com/"
data-user="54"
data-campaign="69284d2b2282b"
data-placement="69313f977d871"
data-creative="69313829e374f"
data-height="600"
data-width="300"
data-responsive="false"
data-adtype="generic_ad"
data-env="false"
data-var-img="https://ads.adctv.com/assets/1/3b/6931551b16f3b.png"
data-var-bgcolor="yellow">
</ins>
<script src="https://ads.adctv.com/scripts/src/v2/tag.ins/tag.ins.js"></script>How variables appear inside your custom method
variables.bgcolor
variables.img3. Variables in VAST Tags
&var-{name}={value}
Example — VAST URL
https://example.com/vast.xml?creative=123&placement=45 &var-theme=dark &var-autoplay=true &var-volume=0.5
Inside your custom logic
variables.theme // "dark"
variables.autoplay // "true"
variables.volume // "0.5"4. Accessing Variables Inside Custom Methods
Below are the steps required to apply tag variables inside your creative.
4.1 Select “Events” Tab

4.2 Select a Trigger from the List


4.4 Create a New Method
You can now write your own custom code.

4.5 Writing Custom Code (Example)
In this example, the creative uses two components:
Countdown Timer
Image Component
The image component has no uploaded asset.
Instead, we inject the image dynamically using a variable from the tag.
We use:
- img → for image URL
- bgcolor → for screen background color
Accessing variables
variables.img
variables.bgcolorImportant:
To apply variables to a specific component, select the element by its ID first.The widget and screen IDs will visible on custom method codeblocks

Sample Custom Code
/*
Layers and their IDs
Screen list
Screen 1 = #s10001_14318
Widget list
Countdown = #w10006_74144
Image = #w10007_24899
*/
let img = document.querySelector("#w10007_24899");
img.children[0].setAttribute("source", variables.img);
let screen = document.querySelector("#s10001_14318");
screen.style.background = variables.bgcolor;4.6 Save the Custom Event

4.7 Export the Creative

5. Updating Variables in the Tag
Use the exported INS/VAST tag on your domain and append the variables you want to control.
These variables will be available inside your custom code through:
variables.{name}
// or
variables["{name}"]Example INS Tag with Variables
<ins id="adctv"
class="adctv-ads"
data-tenant="1"
data-cdn="https://ads.adctv.com/"
data-user="54"
data-campaign="69284d2b2282b"
data-placement="69313f977d871"
data-creative="69313829e374f"
data-height="600"
data-width="300"
data-responsive="false"
data-adtype="generic_ad"
data-env="false"
data-var-img="https://ads.adctv.com/assets/1/3b/6931551b16f3b.png"
data-var-bgcolor="yellow">
</ins>
<script src="https://ads.adctv.com/scripts/src/v2/tag.ins/tag.ins.js"></script>Variables used
- data-var-img
- data-var-bgcolor
Preview
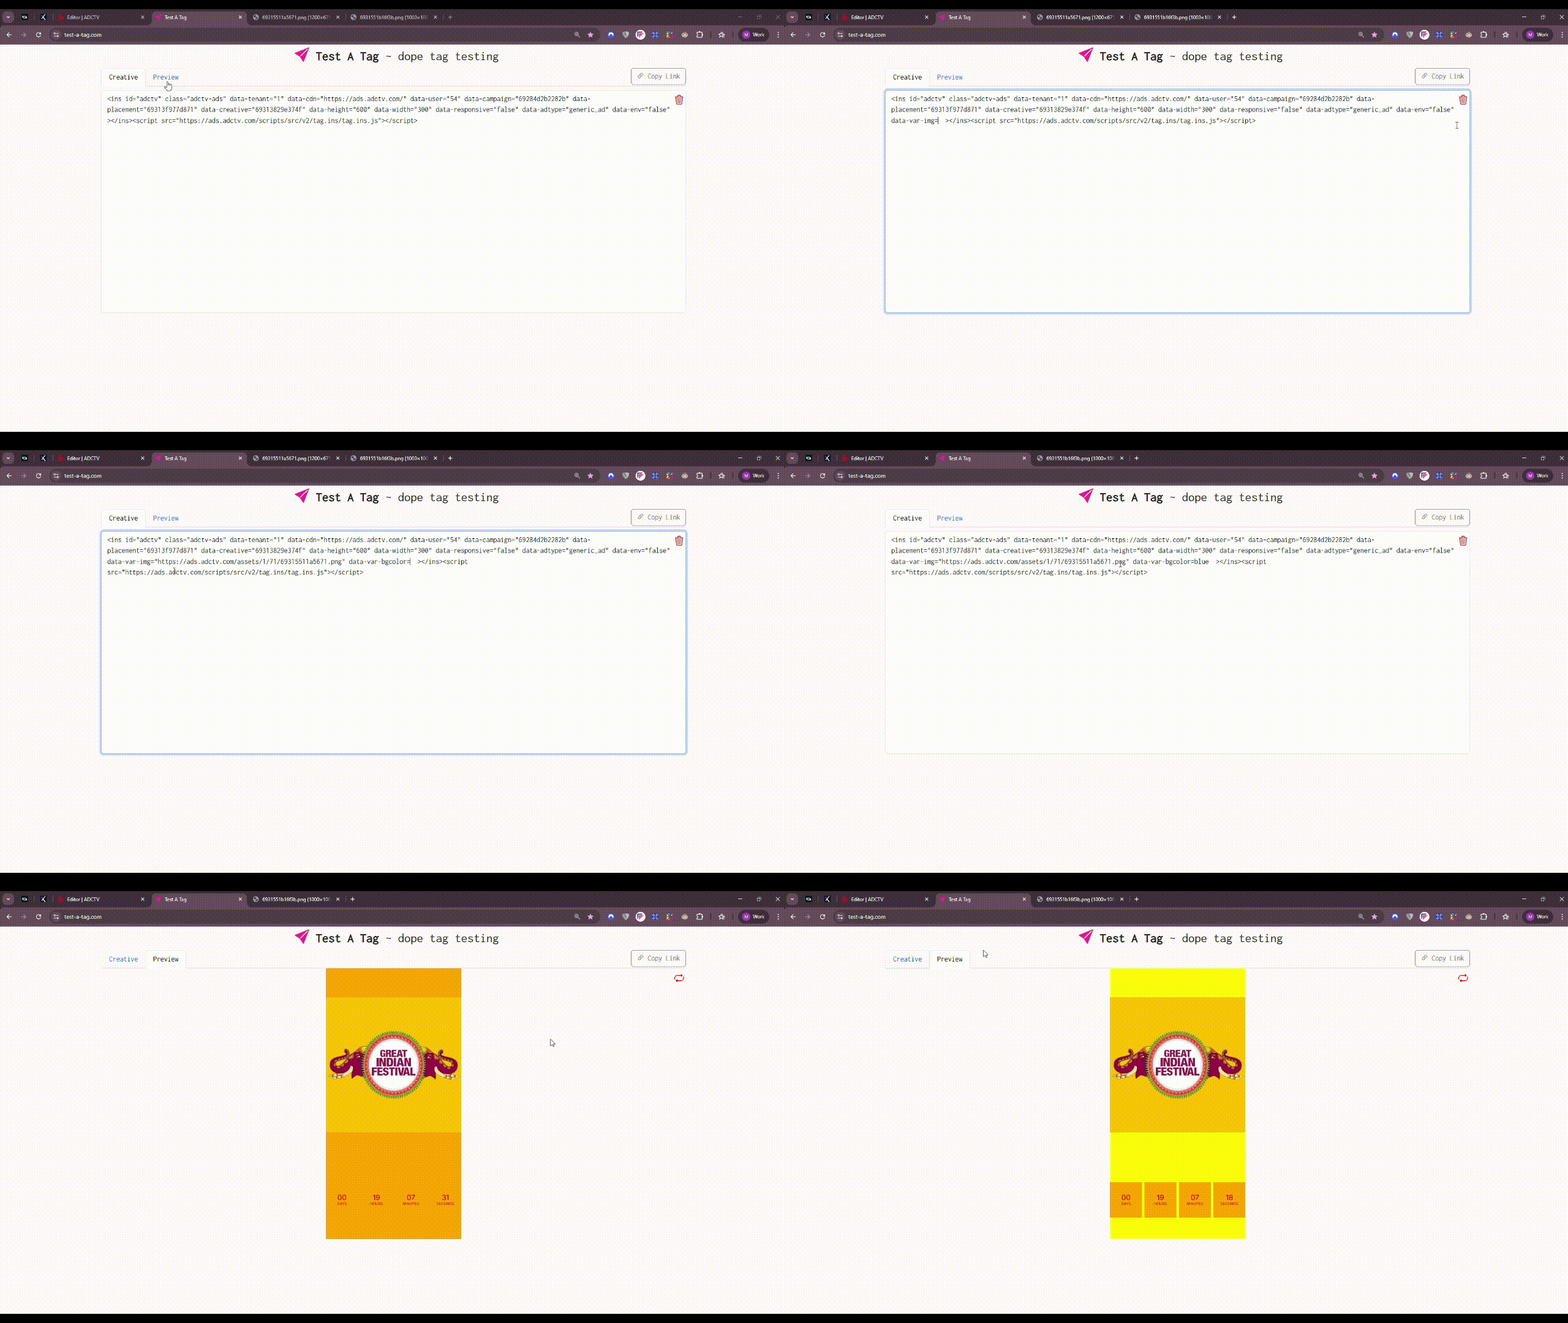
6. Usage
Variables make creatives dynamic and reusable without modifying the creative.
By simply changing the variables inside the tag, you can deliver different versions instantly.
This eliminates the need to:
- Create multiple creatives
- Upload separate assets
- Manage separate placements
- Duplicate analytics
Analytics remain centralized in a single placement.
7. What Users Can Do With This
7.1 Update Widget-Specific Properties
Change component properties using variables:
- Text
- Colors
- Images
- Sizes
- Timings
- Visibility
- URLs
7.2 Create Region-Specific or Partner-Specific Content
Output variations for different:
- Headlines
- Offers
- CTAs
- Images
Perfect for large-scale distribution.
7.3 Enable Real-Time Content Updates
Marketing teams can change content instantly by editing tag variables.
- No rebuild
- No re-upload
- No developer needed
7.4 Reduce Operational Overhead
One creative → unlimited variations
Cuts down asset creation time and maintenance.
7.5 Support Dynamic Personalization
Variables allow personalization based on:
- Domain
- Audience segment
- Publisher
- Geo
- Campaign logic
Everything becomes adjustable from the tag.
Context Variables
Overview
Context Variables are values describing the user's current environment. They are resolved before the creative is rendered and are available for binding directly in components.
Context variables are divided into two categories:
- Context Variables – Values obtained directly from backend services (Geo, Weather, Network, Bot, Time).
- Advanced Context Variables – Values computed from one or more raw context variables.
Variable Categories
Category | Source | Description |
|---|---|---|
Geo | Backend | User location |
Weather | Backend | Current weather conditions |
Network | Backend | ISP, protocol, RTT |
Bot | Backend | Bot detection |
Time | Backend | Local time information |
Device | Browser | Device characteristics |
Viewport | Browser | Viewport dimensions |
Derived | Backend | Computed contextual values |
Context Variables
Geo
Variable | Type | Description |
|---|---|---|
| String | ISO country code |
| String | City name |
| String | State or region |
| Number | Latitude |
| Number | Longitude |
| String | IANA timezone |
Weather
Variable | Type | Description |
|---|---|---|
| Number | Temperature (°C) |
| Number | Feels-like temperature |
| Number | Humidity (%) |
| String | Weather condition |
| String | Icon URL |
| String | Description |
| Boolean | Day/Night |
| Number | Precipitation |
| Number | Wind speed |
| Number | UV Index |
| Number | Visibility |
| String | Sunrise |
| String | Sunset |
Time
Variable | Type | Description |
|---|---|---|
| Number | Unix timestamp |
| Number | Hour (0–23) |
| Number | Day index |
| String | IANA timezone |
Network
Variable | Type | Description |
|---|---|---|
| String | ISP name |
| Number | ASN |
| String | HTTP protocol |
| Number | Round-trip time |
Bot
Variable | Type | Description |
|---|---|---|
| Number | Null | Bot score |
| Boolean | Bot detection |
| Boolean | Corporate proxy |
Advanced Context Variables
Overview
Advanced Context Variables provide higher-level contextual information that creatives can consume directly without implementing business logic.
Weather
Variable | Parameters | Type | Possible Values | Description |
|---|---|---|---|---|
|
| String |
,
,
| Categorizes the current temperature. |
|
| String |
,
,
,
,
,
| Normalizes weather conditions into common categories. |
|
| String |
,
,
,
| Classifies UV intensity. |
|
,
| String |
,
,
,
| Indicates perceived outdoor comfort. |
|
| String |
,
,
,
| Categorizes wind intensity. |
|
| Boolean |
,
| Indicates whether it is currently daytime. |
|
| String |
,
,
,
| Classifies precipitation intensity. |
|
| String |
,
,
| Categorizes current visibility. |
|
,
,
,
| String |
,
,
| Indicates suitability for outdoor activities. |
Time
Variable | Parameters | Type | Possible Values | Description |
|---|---|---|---|---|
|
| String |
,
,
,
,
| Current part of the day. |
|
| Boolean |
,
| Indicates whether today is Saturday or Sunday. |
|
,
| Boolean |
,
| Indicates whether current time falls within typical work hours. |
|
| Boolean |
,
| Indicates typical commuting periods. |
|
| String |
,
,
,
,
| Current meal period. |
|
,
| String |
,
,
| General activity state based on time. |
Network
Variable | Parameters | Type | Possible Values | Description |
|---|---|---|---|---|
|
,
| String |
,
,
| Overall network performance classification. |
|
,
| Boolean |
,
| Indicates whether the connection is suitable for rich media. |
|
| String |
,
,
| Recommended video quality tier. |
Traffic
Variable | Parameters | Type | Possible Values | Description |
|---|---|---|---|---|
|
,
,
| String |
,
,
| Overall traffic quality assessment. |
|
,
,
| Boolean |
,
| Indicates potentially suspicious traffic. |
|
,
,
| Number |
| Numeric trust score for the request. |
Audience
Variable | Parameters | Type | Possible Values | Description |
|---|---|---|---|---|
|
,
,
,
,
| Number |
| Indicates how suitable current conditions are for outdoor activity. |
|
| String |
,
,
| Likelihood that the user is outdoors. |
|
,
,
,
,
,
,
| String |
,
,
| Estimated shopping intent. |
|
,
,
,
| String |
,
,
| Estimated likelihood of interacting with the creative. |
|
,
,
,
,
| String |
,
,
,
,
| Estimated current mobility state. |
|
,
,
,
,
| String |
,
,
,
| Estimated user mindset. |
|
,
,
,
,
| String |
,
,
| Estimated purchasing context. |
Device
Variable | Parameters | Type | Possible Values | Description |
|---|---|---|---|---|
|
,
| Boolean |
,
| Indicates whether the device and connection are suitable for rich media experiences. |
|
,
,
,
| String |
,
,
| Recommended creative experience tier. |
Media
Variable | Parameters | Type | Possible Values | Description |
|---|---|---|---|---|
|
,
| String |
,
,
,
| Recommended maximum video resolution for the current connection. |